
Assembling Your Flute
It is important to take time to acquaint yourself with the flute before you breathe air into it. The flute consists of three elements, the flute body, the totem (also called the block or birdie), and a leather strap.
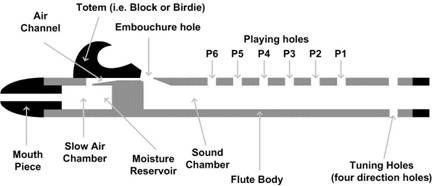
The picture below is a cross section of a typical flute. Take a moment to familiarize yourself with the various names of each part of the flute.
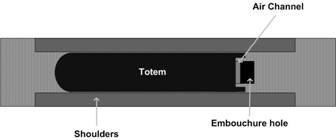
The position of the totem on the flute is important. Typically the totem is positioned so that the edge of the totem is just back from the edge of the embouchure hole. By changing the position of the totem you can change the quality of the sound the flute produces. The picture below is like looking down onto the top of a flute.
Notice that the totem is just back from the edge of the embouchure hole. The further back the totem sits from this hole the more windy the sound of the flute. The further forward, the clearer the sound. However, too far forward and the flute will not play.
To secure the totem to the flute, place the totem on the flute and wrap the leather around the flute and the totem twice. Use a simple overhand knot (the first step in tying your shoes) to secure the totem to the flute. Tighten the leather so the totem is held tightly in place. After the totem is secured to the flute, slide the totem forward or back until it is in the position indicated in the picture above.
Approaching Your Flute
First, find a good quiet place to sit down. Relax, and sit with normal posture. Hold the flute on your lap with your palms up, flute lying across them. Now, close your eyes and take a deep breath - feel the wood in your hands and clear any thoughts other than this experience.
Pick-up the flute, and with one hand put your thumb under the top hole (P6), placing your fingers over the top 3 holes (P6, P5, and P4) – index finger on top, second, and then third (use which ever hand feels best for this position, usually it’s the right hand).
Cover holes P1, P2, and P3 with the fingers of your other hand. Rest your pinky fingers on either side of the flute. The thumbs and pinkies are used to hold and balance the flute.
It is important that each playing hole is completely covered. This is best accomplished by laying your fingers flat across the holes. Ideally, the hole should be covered with the pad of your finger and will be about half way between the tip of your finger and the first joint of your finger.
Move the flute so you can see the finger hole area. Look closely and notice any holes that are only partly covered. Pay close attention so that all parts of the holes are completely covered. This is important because if a hole is exposed, the flute may squeak. Take your time, and relax. Keep a semi-firm grip on your flute. At first, new players tend to use too strong of a hold, which makes it difficult to play.
Notice your posture, relax, keep it natural, and hold the flute in a way that is comfortable to you. With all the holes covered, put the flute up to your mouth and rest it on your bottom lip. The top lip then come down into contact with the mouth piece and makes a small seal. A common mistake is to place the mouth piece of the flute inside the mouth. This will make it difficult for you to use more advanced techniques. So, simply hold the flute up to your mouth and gently seal the blow hole with your lips.
Gently blow into the flute. You should hear a rich tone. If you have a squeaking sound, it probably means that all the holes are not covered or you blew too hard. If you get a nice clear note, it’s called the bottom note or fundamental note. People commonly say that doing this is the most difficult step in playing the native flute.
Gradually increase the air pressure to the flute. As you increase the pressure the flute may jump up to a higher note. This is called the over blow. Back off of the pressure just enough for the flute to not over blow. This is the pressure to which the flute is tuned.